In the article I will consider the conditions and possible options for the restoration and alteration of the Soviet armchair. I will tell you about the features that must be considered when restoring old furniture. I will write down the requirements for the necessary materials and tools. I will consider the types of reworking an old chair, and provide original ideas for updating furniture.
The main features of the restoration of the old chair
The process of restoring damaged furniture is not a partial restoration of parts, or the replacement of upholstery, it is giving a new look to an old chair, an opportunity to refresh. Alteration is carried out in the case when the legs stagger, the upholstery is erased, the springs stick out, or the structure is loosened.
A feature in the process of restoration is that it is quite difficult to produce it on your own, so this business is entrusted to professionals.
You can partially redo and restore upholstered furniture on your own:
- dismantle the upholstery;
- make a constriction;
- repair or replace legs.

It is worth trying to restore furniture with your own hands with sufficient experience in furniture repair or with a lack of money for high-quality material.
Of the minuses of the restoration, one can only note the lack of professionalism in the restoration business.
Advantages of restoration at home:
- cost savings;
- the value of the interior item increases;
- the interior is refreshed.
Necessary materials and tools
First you need to pick up a set of tools and materials.
You can use a standard set of tools, and a set of brushes and paints for a painter. Not available tools are purchased according to the recommendations of the master, so as not to harm the details during work. Furniture made of pure wood is afraid of floors, so it can dry out.

Required materials and tools:
- chisel, spatula;
- hammer, screwdriver;
- stationery knife, wood glue;
- set of brushes, roller;
- acrylic paints, water-repellent varnish;
- grinding machine, foam rubber;
- stapler, sandpaper, new springs;
- screwdriver, awl, large needles with silk threads.
The main types of alteration and materials
The restoration of upholstered furniture, as well as the restoration of an old chest of drawers, is divided into types that can be combined.
Padding
This method does not affect the restoration of the framework. Here the upholstery fabric is pulled. It is attached either to the old coating, which is not recommended by the masters, but this makes the chair voluminous. Or change the coating along with the filler.
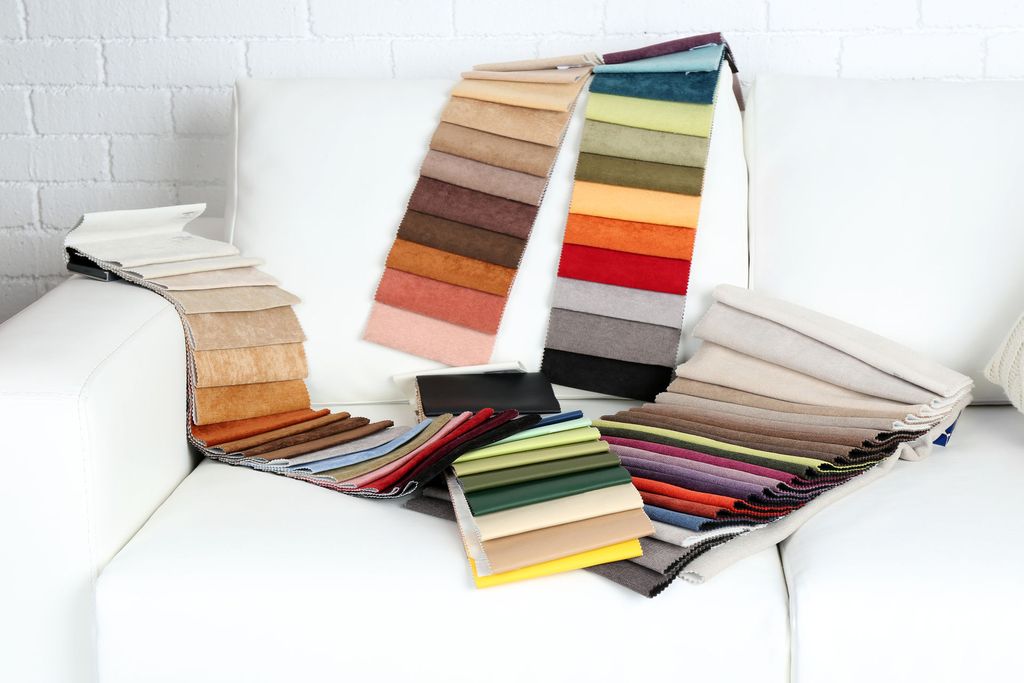
High quality and durable fabrics
- velor, velveteen;
- eco-leather, jacquard;
- flock, tapestry;
- microfiber, chenille.
For the inner upholstery of the filling, a dense crinoline is suitable. The density and elasticity of the material will not allow foam rubber and springs to stick into the upper upholstery.
The stretch is done like this:
- parse armchairs, even if it contains wooden handles or a back;

- unscrew the bolts that fasten the legs to the frame;
- remove the armrests, disassemble the bottom;

- remove upholstery from the seat, armrests, back;
- the old upholstery is applied to the new fabric, the details are cut out according to the exact parameters;
- foam rubber is cut according to the parameters of the bottom with an addition of 2-3 cm;
- springs are attached to the bottom, then the filler, the structure is fixed with internal upholstery;

- armrests sheathed with foam rubber and inner fabric, the back is restored as its bottom;
- the details of the cross are attached to the frame, lined with outer fabric.

The constriction is made for a soft version. Furniture with the presence of wooden parts is subject to complete repair.
Upholstery
Restoration method for a chair with a rigid base. It looks like furniture with clear geometric lines, upholstered in dense fabric with dense foam rubber inside.
Recovery requires:
- remove the top lining;
- remove the filler and its fasteners;
- new parts are cut out on old parts;
- the structure is checked for looseness, the damaged frame is replaced or restored;
- the filler is fixed to the new base with a stapler, then the upper upholstery.
This method of restoration is suitable for armchairs with a solid wooden base.

Repair
General view of the restoration work. Combines the process of upholstery, upholstery and complete replacement of the base. The design is checked for damage, the legs are replaced, a metal mount is added for strength.
Restore the surface with paints, varnishes, additional tools. This method of restoration is quite complicated, the chair is given to the work of masters.
What accessories may be needed
When restoring office chairs or models with movable wheels, casters or crosses are needed. In order not to injure the surface of the laminate or parquet, purchase sets of rollers with a mechanical lock.


Complete overhaul:

The master can update the chair more qualitatively, but it is possible to restore it yourself. It is necessary to choose high-quality upholstery material. Restore the appearance of furniture to match the interior of the room. Then there will be no need to purchase new furniture.
Chairs and armchairs are used more intensively than many other pieces of furniture. As a result, they wear out faster and stronger. And what can we say about the old samples!
Chair upholstery scheme
The most vulnerable in their design, as a rule, are the bearing parts. They fail faster than other elements. Today, do-it-yourself chair restoration at a high-quality level, thanks to the availability of excellent tools and materials, is available even to a beginner.
But in order to either partially repair the chair, or completely restore it, you do not need to call a carpenter at all. You just need to know some of the technological features of this process.
Materials and tools needed to remake an old chair

To haul the chair you will need: a screwdriver, self-tapping screws, a stapler, staples and a screwdriver.
For the convenience of the master and excellent quality of work, you will need the following:
- upholstery fabric;
- foam rubber;
- wooden (plywood) shield;
- varnish for furniture;
- stain;
- wood glue;
- electric drill;
- vibration grinding machine;
- stapler;
- pliers;
- wire cutters;
- screwdrivers;
- spanners.
Partial restoration of the chair
It often happens that it is not necessary to completely restore the chair. For example, if it has a well-preserved fabric or leather upholstery, but the legs are very loose, then a major update of such an item is not required - just take care of the legs.
Consider the most frequent cases of breakdown of the components of the chair, the restoration of which will give a second life to the entire product.

Leg mounting diagram.
The first case: the legs stagger a lot. The easiest restoration option is to put the legs on glue in their original places. The main disadvantage of this option is the fragility of the glued legs. To eliminate it, it is recommended, in addition to gluing the legs to a horizontal bar, to additionally connect the fastened parts, for example, with dowels.
To do this, the entire repaired unit must be slowly disassembled. It is advisable to replace the spike. At the same time, the joints are covered with fresh wood glue, the spike is inserted into the seat. For tight fastening, the junction is pulled together with a clamp.
After that, 2-3 holes are drilled in the leg, where the dowels are driven in. These auxiliary parts, which are also covered with glue, should be made of hardwood and be slightly larger in diameter than the diameter of the through holes. Holes are drilled on the seat body corresponding to the location of the dowels on the legs. The legs are connected to the rest of the chair, the fastened parts are tightly pulled together and left in this position until the glue dries.

Stages of attaching the upholstery fabric to the frame of the chair.
The second case: the seat belts were greatly stretched. Because of this, an impressive "pit" is formed in the seat. Another defect will have the same effect - the falling out of the nails that hold the straps in the seat body. If it's all about fastening the belts, it must be restored by stuffing new nails. If the reason is stretched old belts, then you can’t do without replacing them with new ones.
When installing new belts, they must be tightened. You can do this with a wooden block. In this case, one end of the belt is attached to the seat frame, while the other end is well stretched with a bar, clamping the belt between the bar and the chair frame. While holding the belt in a taut position, it is nailed to the base.
This must be done in such a way that after that there remains a free section of the belt 30-40 mm long. It is bent and nailed for greater reliability. Between tensioned seat belts leave gaps of up to 100 mm.
Complete restoration of an old chair: the order of work
If a very old armchair has been standing in the room for a long time, not giving "signs of life", this is not a reason to throw it away.
Of course, in many cases it is better to buy a new item, but often the owner really does not want to part with the old thing.

Chair frame.
After all, she can be very beautiful, stylish, and finally turn out to be a real historical relic of the whole family. Don't forget the money savings factor.
In this case, it is worth trying to restore the chair with your own hands. A complete restoration begins, of course, with the dismantling of furniture. To do this, having removed the coarse calico from the bottom of the seat, it is necessary to unscrew the nuts hidden under it. Removing the appropriate fasteners, dismantle the armrests.
The disassembly is followed by the removal of the old, outdated upholstery. If it can still be useful for something, it should be done carefully, gradually removing the staples with pliers. But often the fabric is simply torn off. In any case, it should be remembered that a lot of dust and debris has most likely accumulated under the old upholstery.
Next, an inspection of all internal wooden parts is carried out. Cracks should be impregnated with wood glue, and the defective part itself should be stapled. If the part is not subject to restoration, it is replaced with a new one, using blanks of the same properties and dimensions. Also (if necessary), curly elements are cut out of a wooden shield according to the appropriate sizes and shapes, which have become completely unusable.
Lacquer is removed from all the old elements of the chair, sanding them with a drill with a special nozzle. Finishing is done with a grinder. Wooden parts are stained. After it dries for 5-6 hours, these parts are varnished. After that, you need to let the varnish dry for a day. And only then can you assemble the wooden frame of the product.
Assembly is carried out using metal fasteners, wooden dowels and wood glue. The entire assembly must be allowed to stand until the glue is completely dry.

For the upholstery of the chair, it is better to use wear-resistant fabric.
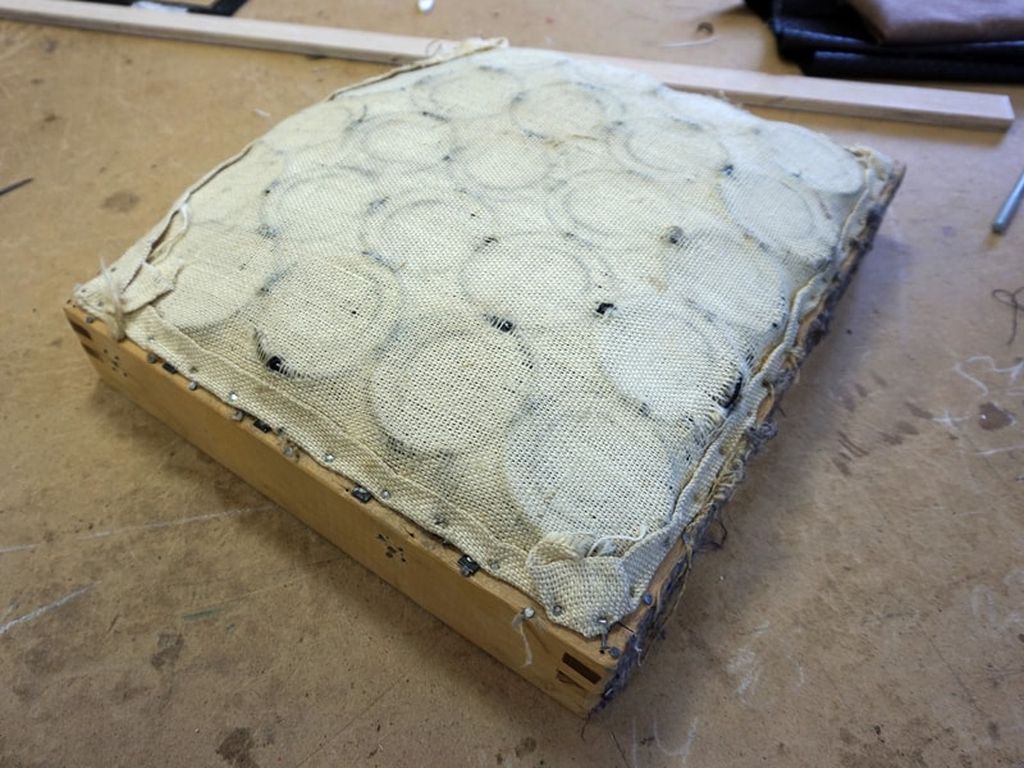
When we completely restore an old chair, most often we have to update the soft filler. Whether the foam rubber needs to be changed or it can be restored can only be judged after its careful examination.
If you have to lay a new filler, then you should first determine the thickness of the old one and add 2-3 cm to its actual thickness (the foam rubber sags by about that much with frequent pressure on it). Then, a new soft component is cut out in the same shape and size as the old filler. At the same time, its density should be at least 22-25. If the density is lower, then it can be increased by placing a layer of spunbond (coarse calico) between the layer of new foam rubber and the old foam rubber.
New foam or other suitable material is glued to the wooden base of the seat or stapled around its perimeter.
At the final stage of the repair, the chair is upholstered with fabric. To do this, you need to cut the old upholstery, previously carefully removed from the chair, into separate elements. Having superimposed these fragments on the prepared fabric, they make cutting of new flaps.
Gradually, by applying individual parts of the fabric to the corresponding parts of the chair, adjacent fabric fragments are sewn to them. It should always be remembered that furniture upholstery is done with a good stretch.
Lastly, the corners of the chair are clogged. The fabric is attached to the wooden frame with staples nailed 2-3 cm apart.
If the master has a desire to radically change the design of the restored chair, then the patterns for the new upholstery cannot be made from the old one. Measurements for cutting will have to be done already in place after laying the new filler.
It is necessary that the quality and density of the new upholstery be combined with the quality and density of the filler. So, if the filler is too soft, a hard and not very elastic fabric may burst due to excessive tension.
When choosing a stapler for repairing furniture, preference should be given to mechanisms with the most powerful spring.
Restoring an old armchair is not only a reason to revive a half-forgotten product, but also a chance to change the style of the entire room environment. So don't be afraid to experiment.
One of the easiest and most unexpected ways to update an old chair is to repaint its upholstery. This option will help if the upholstery is not damaged, but, for example, you need to hide stains or just want to change its color. You can repaint the upholstery using paint from a spray can or from a can. Choose a universal paint or acrylic for fabric, and before painting, you can put a layer of a special primer. You can find paint and primer in construction, art and craft stores. The bonus of such an alteration is that the upholstery treated with paint acquires not only a new color, but also water-repellent properties, and stains from it can most often simply be removed with a damp cloth.
You will need:
Fabric paint;
A large brush for covering wide surfaces and a small brush that is more convenient to paint over the edges;
- a container for mixing paint;
Spray bottle with water;
If desired, masking tape can be used to protect the wooden parts of the chair from getting paint on them, and the primer can be dispensed with without it).
1. First, remove the cushions from the chair. Clean out all the dust, wipe the upholstery with a damp cloth, if there are significant greasy stains, it is better to treat them with a stain remover so that they do not prevent the paint from lying flat.

2. If you want, prime the surface of the chair. You can do without it. In this case, first soak the upholstery with water by spraying it with a spray bottle. Don't forget the seat cushion(s). Before the upholstery is dry, dilute some paint with water in a 1:1 ratio and saturate the upholstery with this mixture. This step is especially important if your chair is upholstered in thick fabric. Before painting, you can protect the wooden parts of the chair with masking tape.

3. When the first layer is completely dry, you can proceed to the second. This time paint the chair undiluted. Carefully go over the brush in all corners, painting over all the necessary areas of the upholstery.


5. If you wish, you can decorate the finished chair with decor by putting it on glue. Ready!


More upholstery chair ideas:


2. How to drag a chair: a master class

This method is, of course, more difficult than repainting. However, by reupholstering, you can almost completely update the old chair, getting rid of holes and scuffs and getting an almost new item for your interior.
You will need:
Hauling fabric (choose a strong, dense fabric);
Scissors;
Sewing machine and thread;
Furniture stapler and staples to it;
Glue gun;
Braid for decoration;
Screwdriver to remove the staples from the upholstery of the old chair.
1. Using a screwdriver, carefully remove the staples holding the upholstery to the chair. The removed parts will serve as patterns for new upholstery parts of the same type. You can remove not all the upholstery or, if desired, not remove it at all. Then you will have to take measurements from the chair and build patterns for new upholstery parts.

Photo: awesomesauceasshattery.com
2. Cut out new fabric upholstery details, not forgetting at least 2 cm allowances. Start shooting them to the chair with a furniture stapler, as shown in the photo.


Photo: awesomesauceasshattery.com
3. The piece for the back of the chair back may need to be constructed from several pieces to fit well on the chair. After sewing it, attach the part with a stapler to the back, bending the edges of the fabric.

Photo: awesomesauceasshattery.com
4. Tape and a glue gun will help to hide the attachment points of the part of the back of the back.


Photo: awesomesauceasshattery.com
5. Finish off by sewing a new chair cushion cover.

Photo: awesomesauceasshattery.com
More upholstered chair ideas:


Photo: fourgenerationsoneroof.com


Photo: lovelylittlelife-hannah.blogspot.com

3. How to restore an old "grandmother's" chair: a master class
Such chairs a few decades ago were in almost every Soviet apartment, and in some houses and dachas they have survived to this day. By the way, today such "grandmother's" chairs, like other items of Soviet design, are back in fashion. No wonder: the design of such a chair is simple and durable, it is comfortable, elegant and concise. In order for an old piece of furniture to decorate your interior, the chair needs to be restored.
Work technology:
1. Remove the wooden parts of the legs and armrests, clean them of old varnish, if necessary, glue and cover with several layers of new varnish.
2. Carefully remove the old upholstery fabric. If necessary, replace the foam by attaching it with a furniture stapler.
3. Using the old upholstery pieces, cut out new ones and attach them to the chair with a furniture stapler.
4. Screw the details of the legs and armrests.
Ideas for reworking the "grandmother's" chair:

Experts consider wood to be one of the most suitable materials for making furniture. This is due to the fact that wooden interior items not only have a decent appearance, but also optimally combine environmental friendliness and quality. Therefore, almost every branded furniture factory necessarily includes wooden chairs in its range.


Peculiarities
Armchairs made of wood can have a different style and decor, you can also choose the texture of the surface, which mainly depends on the type of wood used to make the product. Pine is considered the most budgetary raw material for chairs. This is due to the fact that this type of tree grows in almost all climatic zones of our country.


To create a truly high-quality model, you must not make a mistake in choosing a type of tree. It will depend on how durable the product will be. Also, this factor affects the shade of the chair. For example, if walnut is used as the starting material, then the model will have a soft light color, moreover, cracks will not appear in its structure, which happens with products from other raw materials. One of the most expensive materials is oak.
Armchairs from it usually have a dark color and are very durable, and also resistant to any negative external factors.


When buying a wooden chair, you must be guided by the following criteria:
- No visible defects. The frame of the product should not have chips or small burrs;
- Type of coverage. It is better to purchase wooden chairs with a uniform coating. The structure of the wood itself is unique, but a sharp transition in shade should still alert. This usually indicates that several types of tree were applied when creating the model;
- Documentation. It is necessary to check all quality certificates and product drawings. There should be information about the grade of the source material and the technology of its processing.


Armchairs made of wood have many advantages, the main ones are:
- Natural material. This is one of the main qualities of this type of furniture. Wood does not have compounds that threaten human health in its structure, unlike many other materials (for example, a variety of resins and formaldehydes are used in the manufacture of furniture from chipboard). Therefore, if you are concerned about the environmental safety of your home, then wooden chairs will fit perfectly into your interior;
- aesthetic effect. It is impossible to dispute this fact. There are countless delightful shades that wood chairs can have. The beauty of the product and a variety of stylistic solutions allow you to complement any interior;
- Strength. If solid wood was used as the starting material for the manufacture of furniture, then it can be safely attributed to high-strength models. Such an armchair will not be damaged either by a heavy load or by various kinds of mechanical influences;
- Easy to operate. If in the process of manufacturing the chair all the requirements of GOST were observed, then caring for such a product will not cause any difficulties. They can be wiped with a dry or slightly damp cloth. You can also use a special tool designed to care for this type of furniture. Another positive feature of wooden furniture is resistance to the rapid accumulation of dust on the surface;
- Durability. A wooden chair, on average, can last more than two decades.

Models
There are many conditional types of design structures applicable to the manufacture of wooden chairs, among them:
- folding- a transforming model that can be adjusted to your needs, they are very popular and good for arranging living rooms and country interiors;
- Viennese- usually become an integral element of the interior of public institutions, such as bars, restaurants, cafes, public canteens, etc.


- carved– handmade wooden chairs with an exclusive design will be a great purchase for aesthetes;
- with armrests- a model with sidewalls for hands, indispensable for lovers of comfortable rest;


- in retro style- all opponents of Modern in the interior will like furniture made in vintage style;
- on a wooden frame– models optimally combine quality and design, which will not soon go out of fashion;
- sun loungers– rest by the sea or by the pool cannot be imagined without this model of wooden chairs;


- children's- in our time, the furniture market is full of various models designed for children's rooms, which are good for relaxing, sleeping and studying;
- rocking chair- a model that adds coziness and home warmth even to the most "dry" interior;
- with soft seat- suitable for use in any interior;


- with overlay pillows– the model provides the most comfortable rest;
- classical- has always been in great demand among conservatives in the choice of furniture;
- armchair-beds- a convenient option for small rooms.


Array types
The main property of solid wood is that it consists entirely of wood and does not contain any synthetic impurities. Naturally, this characteristic affects the quality of the product. Furniture items made of solid wood are characterized by high durability, and also add a touch of elegance and high aesthetics to even the simplest interior.
The durability of such chairs is associated with the characteristics of the wood structure and its chemical properties.


This type of chair is created using the technology of splicing wooden shields.
Due to the fact that solid wood retains sufficient elasticity while maintaining a certain temperature, during the manufacturing process, the product can be given absolutely any shape. In addition, furniture made using this technique retains good thermal conductivity for a long time, which is an important quality for armchairs.
Solid wood products (especially handmade ones) are versatile and can fit into any design project. All thanks to the unique natural patterns. Now the furniture market is full of cheaper options for the so-called "glued massif". But it is not difficult to distinguish such a product from a high-quality armchair made of solid wood - the latter have patterns on the surface with a gradual color transition. It happens that when creating a more economical version of a chair, designers use two types of array.


How to update?
To qualitatively restore an old wooden chair, it is not at all necessary to seek help from a master. It can be "reanimated" on its own.
Updating an old wooden chair is a task that even a novice carpenter can do.
On average, this process takes 2-5 hours, depending on the experience of the master.


First you need to prepare the tools necessary to perform this type of work. Among them:
- stain of the selected color;
- construction stapler;
- furniture varnish;
- screwdriver;
- Grinder;
- fabric to be used as upholstery;
- electric drill;
- foam rubber (will be used as a filler for upholstery);
- wooden shield;
- glue for wood products.


Product disassembly
It is necessary to remove the coarse calico (spunbond, chernukha) from the lower section of the seat. Now in this place you need to find and unwind 4 nuts.
The back of the chair and the seat are connected by two bolts. They also need to be untwisted and divided into separate parts. After performing these simple manipulations, you should get 1 seat, 1 back, 1 back, 2 armrests.


Removing the seat upholstery
There are two techniques for removing upholstery from a chair:
- slowly remove staples with a special tool;
- fast rip off with pliers and a screwdriver.
When doing this work, it is important to keep in mind that a lot of debris usually accumulates under the upholstery.
When it is detached, it is necessary to remove all old brackets from the frame.

Product repair
The algorithm of actions is as follows:
- First, you should carefully check if there are any damages on the elements of the chair. If a breakdown is found, then it must be repaired. If during the restoration process it was found that the leg of the chair, made of chipboard, was deformed and began to crumble, then it should be redone. This is where a furniture shield comes in handy.
- The next step is sanding the details. This is the most labor intensive manipulation. Using a drill with a special nozzle, you need to carefully remove the old varnish from the wooden elements of the chair. After that, using a grinder, they need to be cleaned until the natural color of the wood is visible.
- Next, it is necessary to cut out parts of a suitable shape from the furniture board and apply stain to other elements of the product. They will dry for about 6 hours. After complete drying, they must be covered with furniture varnish. In order not to distort the natural shade of the wood, it is better to apply it in a thin layer. It will dry for about a day.
- When all the elements of the chair are dry, you can assemble the legs, having previously made holes in them designed for connection with other parts of the chair. After that, using glue for wooden products, you need to connect all the elements together. The glue will dry for at least three hours.
See the next video for a master class on repairing a chair with your own hands.
Filler update
First, you need to pay attention to the condition of the foam rubber. If the filler has become obsolete, then it is better to replace it or try to update it. To change the filler, it is necessary to determine the thickness of its "predecessor" and add 2 cm to it (the foam rubber sags over time). Usually, for this type of work, a certain type of furniture foam rubber is used, having a thickness of 2-3 cm.

Upholstery work
After completing all the preliminary work, you need to start making upholstery. Before this, you should measure the old upholstery and leave an allowance of 4-5 cm on each side of the canvas. Having measured all the dimensions, you can start cutting a new upholstery. It is important to remember that the new upholstery must have a good degree of tension.
Corners are processed last. Staples should be punched at a distance of 3 cm. If the gap between them is larger, then differences will be noticeable.
At the end of the upholstery, using a long screwdriver, you need to make holes where the bolts will go. Staples should be punched around the holes to avoid damaging the tissue in this area.


Final assembly of the product
We assemble in the reverse order. It is better to put new nuts and bolts. It is necessary to attract them through the washers, since subsequently the nuts can be pressed into the frame and it will be unstable. A new fabric needs to be attached to the bottom of the seat.
As you can see, repairing a wooden chair yourself is not so difficult.
You will learn more about how to repair a wooden chair yourself from the following video.
Spectacular examples in the interior of the house
A wooden chair adds coziness even in a “dry” business interior. It is perfect for both leisure and work. Such a product will harmoniously fit into any place in the house, whether it be a veranda, a bath, a bedroom, a living room or a dining room. Whatever the style of the interior, a wooden chair is sure to take a central position there.
At my dacha, there was a chair for a long time, since my grandmother's time. I always liked it very much, and then I came up with a plan for its restoration. Moreover, in recent years, "vintage" is becoming increasingly important. Then I decided to bring it home and update it.
So, for work we need:
- Stain (you can choose the color that suits you);
– Furniture varnish (we used varnish in a bottle);
– Screwdriver;
– Upholstery material (we used curtain material);
- Foam rubber (to give the seats a softer and thicker coating);
– Construction stapler;
– Wooden shield;
– Glue for wood;
– Drill;
- Vibration grinder.

1. First you need to disassemble the chair.

During our disassembly, it became clear that one part of the legs consists of chipboard and over time it dried out and began to crumble. This item was not recoverable. We decided to replace it with a wooden furniture board.
2. Now we need to sand all these details. This is the longest and most difficult process. Stock up on patience. We removed the varnish from the parts using a special iron nozzle on a drill. And then, the train was cleaned with a machine until the natural color of the tree appeared.


3. Then we cut out the details of the shape we need from the construction board and cover all other details with stain.


We have chosen a dark color. Now we wait 5-6 hours until the stain is completely dry. After that, we cover them with furniture varnish.

We really wanted to preserve the effect of natural wood, so we did not want to achieve a thick and shiny layer of varnish. The drying time of the varnish is approximately from 22 hours to a day, it depends on the thickness of the coating.
4. After all the details have dried, we begin to assemble the legs. To do this, we needed to drill holes in new parts in order to connect them with the rest of the parts.

Then, using furniture glue, we connect all the parts together and leave for 3 hours for the glue to dry.
5. We proceed to the sheathing of the chair seat itself. We remove the old coating and take out all the nails and staples. We left the old foam rubber because it did not deteriorate much.

Our goal is to make the chair more voluminous, so we cut out the new foam and put it on top of the old one.

We cut off the corners of the new foam rubber so that the edges are not very straight, but slightly rounded.

After, we sew the old foam rubber to the new one so that it does not walk and does not move inside the chair.

6. Now you can fit the seat with material. Our chair is not a complex geometric shape, so we successfully managed to fit it in one piece without resorting to sewing. Gently pulling with the help of a construction stapler, we sew it to the frame of the chair.


